最近许多用户在寻找一种在网站的侧边栏按照文章的类别来显示文章的方法。文章显示如下图:

这里给大家介绍两种方法,通过这两种方法均可以实现在WordPress网站侧边栏按类别显示文章。第一种方法比较适合初学者,因为这个方法用到一个现成的插件。第二种方法则是用一段代码,这个方法比较适合DIY用户。
方法一:插件法
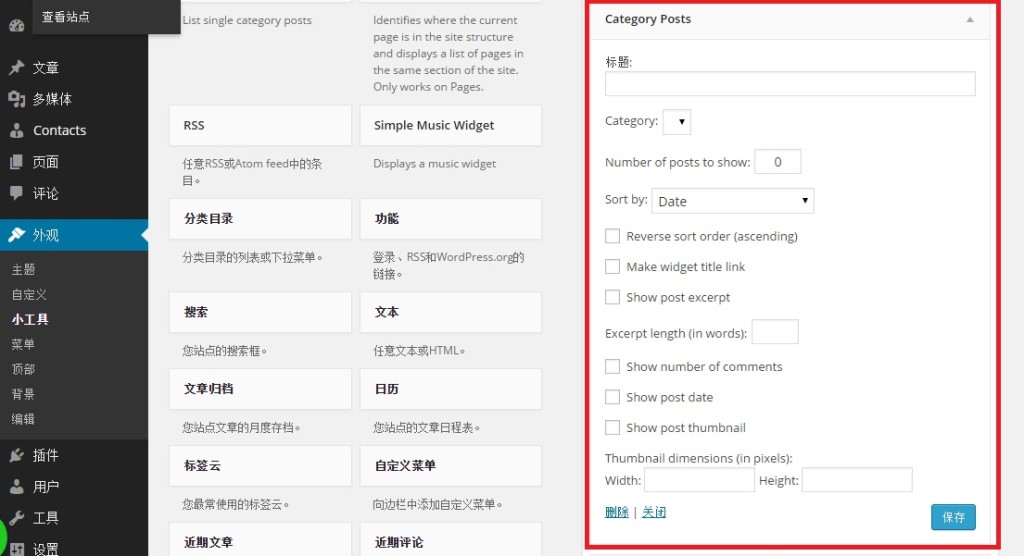
首先安装启用 Category Posts Widget 插件,然后打开外观菜单下的widgets选项,你会发现有一个新的小工具:Category Posts出现在列表中。
点击并拖动该小工具到你想要按类显示文章的区域。在挂件区会展开一个小工具设置选项如下图:

接下来你需要提供小工具的标题,选择一个文章的类别,另外你还可以选择填写其他项目,比如文章排序方式和数目等等。所有的都设置完成后点击保存按钮。现在查看你的网站你会发现,在侧边栏小工具区域出现了按类显示的文章。
方法二:手动编辑代码法
首先添加下述代码到网站主题的function.php文件中
function wpb_postsbycategory() {
// the query
$the_query = new WP_Query( array( 'category_name' => 'announcements', 'posts_per_page' => 10 ) );
// The Loop
if ( $the_query->have_posts() ) {
$string .= '<ul>';
while ( $the_query->have_posts() ) {
$the_query->the_post();
if ( has_post_thumbnail() ) {
$string .= '<li>';
$string .= '<a href="' . get_the_permalink() .'" rel="bookmark">' . get_the_post_thumbnail($post_id, array( 50, 50) ) . get_the_title() .'</a></li>';
} else {
// if no featured image is found
$string .= '<li><a href="' . get_the_permalink() .'" rel="bookmark">' . get_the_title() .'</a></li>';
}
}
} else {
// no posts found
}
$string .= '</ul>';
return $string;
/* Restore original Post Data */
wp_reset_postdata();
}
// Add a shortcode
add_shortcode('categoryposts', 'wpb_postsbycategory');
// Enable shortcodes in text widgets
add_filter('widget_text', 'do_shortcode');
注意:要将代码第三行中的announcements改为你自己的类别。
该代码设置显示10篇文章,如果文章有特色图像,在列表中特色图像也可以正常显示。最后还创建了短代码“categoryposts”
接下来有三种方法,来按类显示文章:方法一、添加下面一行代码到任意一个模板文件中,比如: footer.php, single.php等等
<?php wpb_postsbycategory() ?>
方法二和方法三是在小工具区域、文章或页面添加短代码。
如果想要在小工具区域显示分类文章,你只需要打开小工具界面添加文本小工具到挂件区,然后复制粘贴短代码:[categoryposts],然后保存更新。如果想要在帖子或页面的顶端分类显示文章,只需要在帖子或页面的内容区域添加短代码:[categoryposts]。
同时,我们可以通过添加下述CSS代码到主题或子主题的样式表中,实现对列表的美化。
ul.postsbycategory {
list-style-type: none;
}
.postsbycategory img {
float:left;
padding:3px;
margin:3px;
border: 3px solid #EEE;
}
这篇教程就为大家讲到这里,希望对您有所帮助。


